Showing posts with label ubuntu. Show all posts

Monday, 6 May 2019

Create and install an SSL certificate in Apache

Lets create a SSL encrypted website using apache.

Prequisites:
A working unsecured website on port 80
If your server is behind a firewall you will need to open/forward port 443
A publicly accessible FQDN is configured for the site.

Enable ssl on apache;
sudo a2ensite default-ssl.conf

Installing certbot;
sudo apt install certbot python-certbot-apache

Use certbot to create a free certificate;
sudo certbot --apache certonly

Follow the prompts, they are self explanatory.
Note: This will break if the certbot cannot resolve your domain name properly. I have used the --certonly flag to stop certbot from editing apache configs because I prefer to do it myself. Apparently if you drop that flag you can skip the next step.

Once you are done you should have a shiny new certificate in /etc/letsencrypt/live/www.example.com/

Now, if you did not allow certbot to modify your apache configs you will need tell apache to use your new certificate.

Edit the file that contains the virtualhost configuration for your web site. The virtualhost section should look like this;

        ServerName www.example.com
        ServerAdmin brettg@tuxnetworks.com
        DocumentRoot /var/www/html

        (...)


Modify it to look like this;

        ServerName www.example.com
        ServerAdmin admin@example.com
        DocumentRoot /var/www/html
        SSLEngine on
        SSLCertificateFile /etc/letsencrypt/live/www.example.com/fullchain.pem
        SSLCertificateKeyFile /etc/letsencrypt/live/www.example.com/privkey.pem
  
        (...)


Restart your apache server and you should now be able to browse your site using https.

Note: If you want your site to work in both encrypted (SSL) mode as well as unsecured mode then when you are modifying the virtualhost config in apache copy that entire section to the end of the file and make the changes shown above in the new section

Tuesday, 19 March 2019

autofs: keep devices permanently mounted

I have some ISO images which I use autofs to mount as loop devices.

For reasons that are not important I want them to stay mounted permanently.

I couldn't find any information online on how to do this so I poked around in the related autofs man pages.

I noticed that there is a time out option which is set by default to 600 seconds.

I wondered what would happen if I set that to 0 seconds so I tried it.

So far the devices in question have stayed mounted for 15 minutes

Here's how to do it:

/etc/auto.master
/mnt/loop /etc/auto.loops -t 0

/etc/auto.loops
* -fstype=iso9660,loop     :/store/ISO.archives/&.iso


The -t 0 is where we set the time out to 0 (infinite)
   
In case you are wondering the * at the beginning and the &.iso at the end of auto.loops will mount all of the iso files found in the /store/ISO.archives/ directory.

Monday, 3 September 2018

Steam controller doesn't work in Ubuntu 18.04

After upgrading or fresh install of Ubuntu 18.04 your previously working Steam controller will no longer be detected.

To fix this you must install a new package;

sudo apt install steam-devices

Friday, 6 October 2017

Querying video file metadata with mediainfo

I am working on a script that will query media files (mp4/mkv videos) to obtain metadata that can be subsequently used to rename the file to enforce a naming convention. I use the excellent mediainfo tool (available in the standard repositories) to do this.

mediainfo has a metric tonne of options and functions that you can use for various purposes. In my case I want to know the aspect ratio, vertical height and video codec for the file. This can be done in a single command;

mediainfo --Inform="Video;%DisplayAspectRatio%,%Height%,%Format%"

This works fine and returns something like this;

1.85,720p,AVC

When I say it works fine I mean it works fine in 99% of cases. The other 1% are made up of files that contain more than one video stream. Sometimes people package a JPEG image inside the container which is designated internally as "Video#2". In such cases the above command will also return values relating to the JPEG image producing something like this;

1.85,720p,AVC1.85,720p,JPEG

When this happens my script breaks. The workaround for that is to pipe the results through some unix tools to massage the output;

mediainfo --Inform="Video;%DisplayAspectRatio%,%Height%,%Format%\n" "${_TARGET}" | xargs | awk '{print $1;}'

Things to note in the revised command. There is a carriage return ("\n") at the end of the --Inform parameters which will put the unwanted data on a new line like this;

1.85,720p,AVC
1.85,720p,JPEG

xargs will remove that line feed and replace it with a space;

1.85,720p,AVC 1.85,720p,JPEG

And finally awk will produce only the first "word" (space delimited) from the result, which produces the desired output.

1.85,720p,AVC

Now obviously this method assumes that the first video stream in the container is the one we are interested in. I'm struggling to imagine a scenario where this would not be the case so at this point I am OK with that. If I find a file that doesn't work I might have to revise my script, but for now I will stick with this solution.

Friday, 21 July 2017

Booting Windows as either dual-boot physical machine or as a Virtual machine

How to boot Windows as either dual-boot physical machine or as a Virtual machine

Here is a scenario.

You have a Linux PC that you want to also dual boot to Windows. That's not hard to do right?

Unfortunately though, we all know dual booting is a bit of a pain when you just want to do something quick in Windows. You need to close everything you are doing in Linux just to boot into Windows.

One solution to that is to run Windows in a VM, that's been possible for years now right? Well the problem with that is that sometimes you need to run native Windows to say, play a 3D game.

You could maintain 2 Windows systems, one via dual-booting and the other as a VM but who wants to maintain two copies of Windows?

This is what I do.

Our starting point is a Linux system on one disk (/dev/sda). We will be installing Windows on to a separate disk that is currently empty (/dev/sdb)

WARNING: If you muck this up you can destroy all the data on your Linux system. Make sure you have backups of everything and you are abso-fricking-lutely sure you have identified the correct drive devices

You can check your disks using this command:
sudo fdisk -l
For the remainder of this tutorial I will be using /dev/sdb for the drive that will host Windows 7.

Let's get started!

In your Linux installation you want to add your user to the "disk" group:
sudo usermod -a -G disk brettg
This allows your user to access the physical drive that Windows 7 is installed on.

Note: You will need to logoff and log back in again for this change to take effect.

Install Virtualbox:
sudo apt install virtualbox
Create a place for your Virtualbox disk images:
mkdir -p $HOME/VirtualboxImages/
Create a new virtual disk that references the physical drive that Windows 7 will be installed on:
VBoxManage internalcommands createrawvmdk -filename $HOME/VirtualboxImages/Windows7.vmdk" -rawdisk /dev/sdb
Open up Virtualbox and create a new virtual machine selecting "Use an existing virtual harddisk file" when you are setting it up.

Insert your Windows CD into the virtual machine (either as a physical CD or an ISO image).

Start the VM and go through the normal Windows installation process, then log into Windows.

Open the registry editor. Edit the following keys and set them all to 0:
HKEY_LOCAL_MACHINE\SYSTEM\ControlSet001\services\atapi\Start
HKEY_LOCAL_MACHINE\SYSTEM\ControlSet001\services\intelide\Start
HKEY_LOCAL_MACHINE\SYSTEM\ControlSet001\services\pciide\Start
This forces Windows to install and load three types of disk drivers at boot. (I don't know why you need to set these to zero). By default it just installs the driver that was needed at install time. This is requireed because when we try and boot Windows later it will not be able to read the disk because it doesn't have the proper driver for it.

Shutdown the VM

You will need to add your Windows disk to grub:
sudo update-grub
Now, hopefully if everything went according to plan you should be able to reboot and find Windows listed in your grub menu. Select that and boot into Windows.

Once you are in Windows, you will have to do all the usual driver installs etc but you already knew that right?

Have fun!

Note: Tested with Ubuntu 16.04.1 host and Windows 7/10 guests

Tuesday, 24 January 2017

Using H.265 (HEVC) on Ubuntu

If you google search how to install H.265 on ubuntu you get a a bunch of posts that describe how to add a PPA for the necessary files.

However the repository hasn't been updated since 2015 (vivid vervet)

If you try to use the vivid repo then things fail because of dependency issues.

But not to worry as it seems that H.265 is now included in the standard xenial repository.

apt-cache search x265
libx265-79 - H.265/HEVC video stream encoder (shared library)
libx265-dev - H.265/HEVC video stream encoder (development files)
libx265-doc - H.265/HEVC video stream encoder (documentation)
x265 - H.265/HEVC video stream encoder

So, all you need to do is;

sudo apt-get install x265

and you are good to go.


Wednesday, 2 July 2014

Libvirt/qemu/kvm as non-root user

Prerequisites:

A server with KVM

I'm going to use the qemu user that is created when you install KVM but you could use any user you like.

First, your user should belong to the kvm group:

grep kvm /etc/group kvm:x:36:qemu

Create a libvirtd group and add your user to it

groupadd libvirt
usermod -a -G libvirt qemu


Create a new policykit config to allow access to libvirtd using your user account via ssh

vi /etc/polkit-1/localauthority/50-local.d/50-libvirt-remote-access.pkla

Add the following content:

[Remote libvirt SSH access]
Identity=unix-group:libvirt
Identity=unix-user:qemu
Action=org.libvirt.unix.manage
ResultAny=yes
ResultInactive=yes
ResultActive=yes


Restart libvirt

service libvirtd restart

Thursday, 19 September 2013

Disable DNSMASQ on KVM host

I have a fleet of servers with bridged, static IP's running as KVM guests. These servers do not require DHCP yet KVM by default starts up dnsmasq regardless.

Normally this is not an issue but I just so happened to need dnsmasq for DNS on one of the KVM hosts and it would refuse to start due to it being already invoked by libvirt.

You can't just disable the libvirt dnsmasq because it seems required for any virtual network that is active. You can however disable the unused virtual network which has the same effect.

# virsh net-destroy default
# virsh net-autostart --disable default


Then you can configure dnsmasq by editing /etc/dnsmasq.conf and it should work normally.

Saturday, 15 June 2013

Adding a PPA

I'll use the Handbrake video encoder in this example but it will work for any PPA providing you have the correct id string. In this case that is "ppa:stebbins/handbrake-releases"

Add the PPA to your apt repository sources:

sudo add-apt-repository ppa:stebbins/handbrake-releases

If you do an apt-get update now you will probably get an error like this:

W: GPG error: http://ppa.launchpad.net raring Release: The following signatures couldn't be verified because the public key is not available: NO_PUBKEY 6D975C4791E7EE5E

Add the key like this, replacing the key at the end of the command with the one from your previous key error output.

sudo apt-key adv --keyserver keyserver.ubuntu.com --recv-keys 
6D975C4791E7EE5E

You should be able to update again without errors.

Monday, 18 March 2013

SOLVED: "Permission denied" when mounting sshfs

I've just come across an annoying bug while attempting to mount a directory using sshfs.

sshfs brettg@myserver.net:/home/brettg/test /home/brettg/test
fuse: failed to open /dev/fuse: Permission denied


The normal google search resulted in many, many hits explaining that this is due to the user account not being a member of the 'fuse' group.

Trouble is, my user account is a member of the fuse group:

$ groups
brettg adm cdrom sudo dip plugdev fuse lpadmin sambashare libvirtd


Note: To add your user to the fuse group use this command:

sudo usermod -a -G fuse brettg

The problem is that Mint 14 sets the user permissions on the fuse device incorrectly which results in only the root user being able to mount it.

You can confirm this is the case like this:

$ ls -al /dev/fuse
crw------T 1 root root 10, 229 Mar  9 10:15 /dev/fuse


There are two problems here. The first is that the fuse device is not owned by the fuse group. Fix it like this:

$ sudo chgrp fuse /dev/fuse


The next problem is that the group permissions for the fuse device are set to deny access to everyone. Fix that with:

sudo chmod 660 /dev/fuse


The fuse permissions should now look like this:

$ ls -al /dev/fuse
crw-rw---- 1 root fuse 10, 229 Mar  9 10:15 /dev/fuse


Having done this you should now be able to mount a fuse device (such as sshfs) as a normal user (who belongs to the fuse group of course).

UPDATE
Upon reboot, I noticed that the permissions on the fuse device were partly reset;

$ ls -al /dev/fuse
crw-rw-rwT 1 root root 10, 229 Mar 18 12:03 /dev/fuse


However, this does not appear to have had an adverse effect on my ability to mount. I find this to be somewhat confusing.

Tuesday, 25 December 2012

FIX: "Hash sum mismatch" on Linux Mint update

OK, here is the scenario.

I have a Linux Mint machine (maya) that has not been booted for some time.

I started it up and decided to do some housekeeping as a prelude to upgrading it to 'Nadia'

The first thing I did was do an apt-get update which failed with "hash sum mismatch" when updating the Mint list (Sorry, I didn't keep a copy of the full error)

Another machine on my LAN is already on Nadia and it apt-get updates fine.

I use apt-cacher-ng, so I disabled this and tried update again. This worked, which led me to believe there was some corrupt file in the cache somewhere. I spent hours trying to nail this and even did apt-get purge apt-cacher-ng followed by a re-install.

None of this worked.

Eventually something twigged in my brain, and I wondered if there was a compatibility problem with the version of apt on this machine. As I said, it's been some time since I updated.

Here is  what I did;

1) Edited sources.list and commented out the single Mint line, leaving just the ubuntu repositories in place. These were updated from 'precise' to 'quantal'.

2) Did an apt-get update, this worked without errors.

3) Upgrade apt (apt-get install apt) this installed about three new files.

4) Edited sources.list again, removing comment from the Mint line and changed it from 'maya' to 'nadia' while I was there.

5) Another apt-get update and this time there were no errors.

From there everything worked as expected and no more hash sum mismatches!

Wednesday, 29 August 2012

Unmount stale NFS mounts

If you have a stale NFS mount hanging on your system it can cause various programs and utilities to fail. A typical symptom is a hang when using the 'df' command.

In such cases you cant do umount /path/to/stale/nfs because it will say "the device is busy" or words to that effect

To fix this you can unmount it with the 'lazy' option;

umount -l /path/to/stale/nfs

If you don't expect that mount point to ever be available again (for example the nfs server was decommissioned) then make sure you adjust /etc/fstab accordingly.

Sunday, 19 August 2012

Remove Subtitles and Audio tracks from MKV files

To remove unwanted audio and subtitle tracks from Matroska (mkv) files you use mkvtools; sudo apt-get install mkvtoolnix-gui Once it is installed then open up the gui (Sound & Video menu) and follow these steps; 1) In the "Input files" box on the "Input" tab browse to the mkv file you want to modify. 2) In the "Tracks, chapters and tags" box uncheck any part you want to remove (leave the stuff you want to keep checked) 3) In the "Output filename" box keep the default name or modify to suit. 4) Click "Start muxing" and wait a minute or two until it completes. Once you are done, you can delete the original file (after checking it worked of course!) and rename the new file accordingly.

Thursday, 12 July 2012

HOWTO: Squid 3 Transparent Proxy

A lot of the stuff on the Internet describing how to do transparent proxy is outdated and does not work on more recent distro's that sport Squid V3.

This guide is Googles top hit for "squid transparent proxy" but it doesn't work. If you attempt to configure Squid 3 using the "httpd_accel" directives provided in that post squid will simply fail to start.

It seems that the developers of Squid 3 have streamlined the configuration of squids transparent proxy feature down to a single word.

If you find the http_port directive in your squid.conf and add the word "transparent" to the end of it then you have basically configured squid as a transparent proxy.


Find a line like this;


http_port 3128


Add "transparent" to the end so that it looks like this;

http_port 3128 transparent

Restart squid and you are done. All that is required now is to redirect traffic on your firewall to go to the proxy.

You can use your iptables firewall to redirect web traffic (port 80) to your squid proxy with  these commands;

iptables -t nat -A PREROUTING -i eth0 -p tcp --dport 80 -j DNAT --to 10.1.1.1:3128
iptables -t nat -A PREROUTING -i eth0 -p tcp --dport 80 -j REDIRECT --to-port 3128


This assumes that your LAN adaptor (the adapter that your client requests are coming in on) is eth0 and that the IP address of your proxy is 10.1.1.1

You can test that your proxy is working by accessing the Internet from a network client on your LAN and monitoring squids access log file;


tail -f /var/log/squid3/access.log

If you browse to www.tuxnetworks.com while watching the access.log file then you should see something like this;

1342076113.358      1 10.1.1.14 TCP_HIT/200 437 GET http://www.tuxnetworks.com/ - NONE/- text/html

Enjoy! 

Friday, 4 May 2012

HOWTO: Upgrade from Lucid to Precise

UPDATED 12/06/2012. I have had reason to attempt this on two more systems and both times  it was successful.

The Ubuntu distribution continues its rapid decline with the Precise release.

The Internet is teeming with examples of people who have discovered that upgrading to Precise is difficult at best, and near impossible at worst.

It doesn't appear that upgrading from the last LTS, 10.04 Lucid is possible at all.

Well, not easily anyway.

Attempting to upgrade a server from Lucid to Precise will most likely result in an error;

E: Could not perform immediate configuration on 'python-minimal'.Please see man 5 apt.conf under APT::Immediate-Configure for details. (2)

Searching the Internet might lead you to a suggested fix such as this one;

sudo apt-get install -o APT::Immediate-Configure=false -f python-minimal

Apparently, sometimes that doesn't work either, forum post suggests adding apt to that command;

sudo apt-get install -o APT::Immediate-Configure=false -f python-minimal apt

Having got that far, I received another error;

E: Couldn't configure pre-depend multiarch-support for libnih-dbus1, probably a dependency cycle

Joy.

No help was forthcoming from the Internet on that one.

So, I tried a desperate move.

I decided to remove the offending file (libnih-dbus1) and re-install it.

Now, before I continue, I should make it absolutely clear that what follows is capital N Nasty.

The server I was working on was a scratch virtual machine that I would not care about if I accidentally toasted it.

It is entirely possible that doing this on your server may completely trash it!

You have been warned.

OK, with that out of the way, what I did was this;

apt-get remove libnih-dbus1

Apt went away and calculated a whole lot of dependencies that would be removed which resulted in it giving me a nasty warning;

You are about to do something potentially harmful.
To continue type in the phrase 'Yes, do as I say!'


Undaunted, I copy-pasted the list of files being removed into a text editor (just in case) and typed the "Yes, do as I say!" phrase as requested;

After a while apt was finished.

Note: If you are following this "procedure", do not reboot your system now!

OK, I was afraid my SSH session or network (or something) may have been broken causing me to lose my connection (yes, I was doing this remotely) but the server still seemed to be working, which was good.

So I installed everything back.

apt-get install ubuntu-minimal

This returned no errors.


Now, when we did the nasty remove of libnih-dbus1 and its dependents earlier, one of the things that was removed was the Linux kernel.

Without being to dramatic, it is fair to say that this is an extremely important package. Another important thing that was removed was openssh-server

Install them now;

apt-get install linux-image-server openssh-server


The final thing to do is to reboot and to make sure everything is truly OK

The server rebooted without problems and finally I have managed to upgrade from Lucid to Precise.

Yay, I suppose, but it really shouldn't be that hard.


Canonical should spend less time working on horrible user interfaces and more time getting the basics right.

A final note: Check your list of files that were removed to check whether anything else that may have been installed was removed. You should manually re-install anything you need.

Monday, 23 April 2012

Have CRON Log To A Separate File

Sometimes you might want to have cron events logged to a file other than the standard syslog (/var/log/syslog)

This is how you do it.

Edit this file;

vi /etc/rsyslog.d/50-default.conf

Find the line starting with #cron.* and uncomment it.

This will cause all cron events to be logged to /var/log/cron.log (unless you changed  the path) however the same events will also continue to be logged to syslog.

In the same file, find the line that looks like this;

*.*;auth,authpriv.none  -/var/log/syslog

Alter the line so that it looks like this;

*.*;auth,authpriv.none;cron.none  -/var/log/syslog

Restart the logging service;

service rsyslog restart

Now cron will log to /var/log/cron.log but not to syslog


Thursday, 8 March 2012

Remove Unwanted Audio Tracks From AVI Files

If you have downloaded videos from certain sources lately, you may have noticed that it is now possible to create a video container (AVI,MKV) that includes multiple audio channels just like on a DVD.

This is a great thing because it allows people of different languages to use the same video file. Alternately it allows the directors commentary to be included.

That said, I am an English speaker, and I have never had any interest in directors commentaries so all these extra audio tracks represent unwanted data in my movie library.

Also, some files default to playing the commentary or the non English track in some players which is also mildly annoying.

So, in shuch circumstances you can use ffmpeg to remove the unnecessary tracks from an AVI file (I have not tried it for MKV, I will update this page if I do.

Things you need to install are vlc and avconv (avconv is the replacement for ffmpg which is now deprecated)

sudo apt-get install vlc libav-tools

Note: On RedHat based distributions you must install libav. ie:
yum install libav
You can see what audio tracks are available, and select them by opening the video file in vlc and looking in Audio>Audio Track.

Once you have determined which track you want to keep, you can run the file through avconv to strip the unwanted tracks. In this example I use the second map parameter to keep track 2 (ie lose track 1);

avconv -i sourcefile.avi -map 0:0 -map 0:2 -acodec copy -vcodec copy outfile.avi

And that's it, happy Linuxing (is that a word?)

Friday, 24 June 2011

HOWTO: Setup an NFS server and client for LDAP

In this example I am going to setup a shared home directory to hold user homes. You would typically use this if you are using a centralised LDAP server to authenticate users.

Pre-requisites:
A standard Ubuntu server with working network and pingable by name.

You have relocated your local "sudo" user out of the default /home directory.


Configure the Server.

Note:
We are going to use an NFS server to centrally locate our users home directories. Build or select one of your existing Ubuntu servers to act as the host.

My server is called nfs.tuxnetworks.com and I have made sure that it can be pinged by name by my LAN clients.


Login to your NFS server as root;

Install the server software;

~# apt-get install nfs-kernel-server

Create a folder for the user home directories;

~# mkdir -p /store/ldaphomes

To export the directory edit your exports file;

~# vi /etc/exports/

Add this line;
/store/ldaphomes          *(rw,sync,no_subtree_check,no_root_squash)


Restart the NFS server;

~# service nfs-kernel-server restart

Configure the Client.

Install the NFS client;

~# apt-get install nfs-common

We are going to mount our NFS share on /home;

Note:
If you have any home directories in /home, these will become hidden under the mounted directory. Ideally there will be no existing users in /home because you will have shifted your local admin user somewhere else.


Edit your fstab file;

~$ sudo vi /etc/fstab

Add a line like this;
nfs.tuxnetworks.com:/store/ldaphomes      /home  nfs defaults 0 0


Note:
If your /home directory was already being mounted to a block device then you should comment this entry out in your fstab file.

Mount the directory;

~$ sudo mount /home

You can check that it has worked using the df command

nfs:/exports/ldaphomes
                     961432576 153165824 759428608  17% /home


And thats it!

Thursday, 23 June 2011

HOWTO: Change your default user account to a system account

When you deploy a new Ubuntu installation, the first user it creates (uid=1000) will be given sudo privileges.

Sometimes it is desirable to have a specific "admin" user on your system that is separate from your normal user accounts which are located in the uid=1000+ range.

For example, if you are setting up an LDAP network.

Unfortunately, you can't set the uid manually during the initial installation process but you can change it afterwards.

Note:
If you make a mistake during this procedure it is possible to lock yourself out of the system completely. This is not such an issue if this is a freshly installed system but if it is already up and running in some sort of role, then you need to be extra careful. You have been warned!

I am working here with a fresh Lucid server install, and my uid=1000 user is called "sysadmin".

Login to a console session as root;

~$ sudo -i

Manually edit your passwd file;

~# vi /etc/passwd

At the end of the file will be the entry for the "sysadmin" account;

sysadmin:x:1000:1000:system admin,,,:/home/sysadmin:/bin/bash

Change the two "1000"'s to "999";

sysadmin:x:999:999:system admin,,,:/home/sysadmin:/bin/bash

Make the same change in the "group" file;

vi /etc/group

Change the "sysadmin" line to;

sysadmin:x:999:

Changing the uid of a user will break the permissions in their home directory;
~# ls -al /home/sysadmin
total 32
drwxr-xr-x 3 1000 1000 4096 2011-06-23 13:34 .
drwxr-xr-x 3 1000 1000 4096 2011-06-23 13:32 ..
-rw------- 1 1000 1000 48 2011-06-23 13:34 .bash_history
-rw-r--r-- 1 1000 1000 220 2011-06-23 13:32 .bash_logout
-rw-r--r-- 1 1000 1000 3103 2011-06-23 13:32 .bashrc
drwx------ 2 1000 1000 4096 2011-06-23 13:33 .cache
-rw-r--r-- 1 1000 1000 675 2011-06-23 13:32 .profile
-rw-r--r-- 1 1000 1000 0 2011-06-23 13:33 .sudo_as_admin_successful
-rw------- 1 1000 1000 663 2011-06-23 13:34 .viminfo

You can fix that by issuing the following commands;

~# chown sysadmin:sysadmin /home/sysadmin
~# chown sysadmin:sysadmin /home/sysadmin/.*


When we setup LDAP later we will want to mount /home to an NFS share. Unfortunately, when we do this we will overwrite our sysadmin's home folder! Let's move it to the root ("/") directory.

~# mv /home/sysadmin /

We will need to change the path in the passwd file;

~# vi /etc/passwd

Change it from;

sysadmin:x:999:999:sysadmin,,,:/home/sysadmin:/bin/bash

to this;

sysadmin:x:999:999:sysadmin,,,:/sysadmin:/bin/bash

Check that all is well;
~# ls -al /sysadmin
total 32
drwxr-xr-x 3 sysadmin sysadmin 4096 2011-06-23 13:34 .
drwxr-xr-x 23 root root 4096 2011-06-24 11:29 ..
-rw------- 1 sysadmin sysadmin 48 2011-06-23 13:34 .bash_history
-rw-r--r-- 1 sysadmin sysadmin 220 2011-06-23 13:32 .bash_logout
-rw-r--r-- 1 sysadmin sysadmin 3103 2011-06-23 13:32 .bashrc
drwx------ 2 sysadmin sysadmin 4096 2011-06-23 13:33 .cache
-rw-r--r-- 1 sysadmin sysadmin 675 2011-06-23 13:32 .profile
-rw-r--r-- 1 sysadmin sysadmin 0 2011-06-23 13:33 .sudo_as_admin_successful
-rw------- 1 sysadmin sysadmin 663 2011-06-23 13:34 .viminfo


On another console, confirm that you can login as the sysadmin user.

You should get a proper bash prompt;

sysadmin@galileo:~$

Note:
If your system has a GUI login, be aware that the logon screen will not display usernames for users with a UID of less than 1000. To login using the "sysadmin" account in such a case, you would need to type the name in to the username field manually.

Tuesday, 21 June 2011

Getting Up To Speed With IPv6: Get Your LAN Clients Online

This is the latest installment in my series of getting IPv6 working on your network.

Pre-requisites: A router with a working Hurricane Electric IPv6 Tunnel

OK, We will be working on your IPv6 enabled router.

Start by logging in to a console session as root;

sudo -i

First we must enable IPv6 forwarding.

Edit this file;

vi /etc/sysctl.conf

Uncomment this line;

net.ipv6.ip_forward=1

Because we are needing our LAN clients to route out to the Internet they will need to be on their own subnet. Take a look at the "Tunnel Details" page for your tunnel at the Hurricane Electric website.

Mine looks like this;


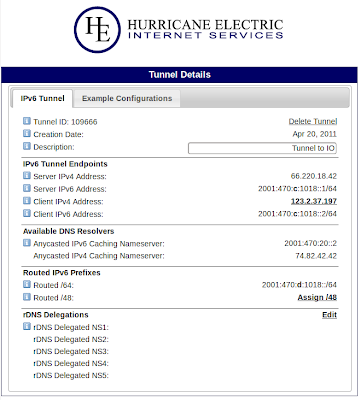
See the section called "Routed IPv6 Prefixes"?

Note down the address for the "Routed /64:" subnet.

For routing to work, just like IPv4, our server must have a static IP address in that subnet.

Edit your interfaces file;

vi /etc/network/interfaces

Add the following lines;
#IPV6 configuration
iface eth0 inet6 static
address 2001:470:d:1018::1
netmask 64
gateway 2001:470:c:1018::2


You will notice that I have chosen to use the "1" address in my routed subnet and the default gateway is set to be the address of my local end of the IPv6 tunnel.

At this point you should reboot the router, and then log back in again as root.

On IPv6 we don't need to use DHCP to provide addresses to our LAN clients (although we can if we want to). Instead of being given an address, our clients will create their own addresses based on the network prefix that our router will advertise on the LAN. This is done using a program called radvd (Router Advertisment Daemon).

Install radvd;

apt-get install radvd

To configure raddvd we need to create the following file;

vi /etc/radvd.conf

Enter the following code;
interface eth0 { 
AdvSendAdvert on;
MinRtrAdvInterval 3;
MaxRtrAdvInterval 10;
prefix 2001:470:d:1018::/64 {
AdvOnLink on;
AdvAutonomous on;
AdvRouterAddr on;
};
};


Note that the prefix here is the same subnet prefix that we used in the previous step (sans the "1" address we added).

Now we can start the radvd service;

service start raddvd

You should now be able to go to a LAN client, refresh the IP address and see that you have a proper IPv6 address!

Lets take a look at a clients address;;
ifconfig eth0
eth0 Link encap:Ethernet HWaddr 52:54:00:64:cf:4d
inet addr:10.1.1.61 Bcast:10.1.1.255 Mask:255.255.255.0
inet6 addr: 2001:470:d:1018:5054:ff:fe64:cf4d/64 Scope:Global
inet6 addr: fe80::5054:ff:fe64:cf4d/64 Scope:Link

As you can see, our LAN client now has an IPv6 Address in our routed subnet.

Try a ping to google;
ping6 ipv6.google.com -c 4
PING ipv6.google.com(2404:6800:4006:802::1012) 56 data bytes
64 bytes from 2404:6800:4006:802::1012: icmp_seq=1 ttl=54 time=444 ms
64 bytes from 2404:6800:4006:802::1012: icmp_seq=2 ttl=54 time=440 ms
64 bytes from 2404:6800:4006:802::1012: icmp_seq=3 ttl=54 time=436 ms
64 bytes from 2404:6800:4006:802::1012: icmp_seq=4 ttl=54 time=437 ms


At this point you should be able to browse on your client to ip6-test.com and test your IPv6 again.


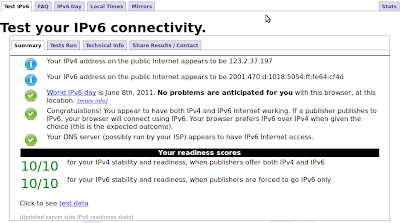
If all is good, you will get 10/10 tests right. If your DNS provider let's you down and you get a 9 don't worry too much, we will cover that topic later.

OK, so your clients now have routable IPv6 address's which is great. However this does introduce some important security related concerns that we must address.

Normally your LAN clients are protected from outside miscreants because they are behind NAT and can't be reached from outside your network.

With IPv6 there is no NAT so all your machines can be reached directly. If you have access to a IPv6 enabled machine outside of your own network try pinging the IP address of one of your LAN clients. You will find that it responds without hesitation. This is especially problematic for any Windows clients on your LAN. Windows listens on a ridiculous number of open ports by default which in turn exposes these clients to attacks from the outside world.

Again from the outside network. try doing "nmap -6 to an address on your LAN. Look at all those listening ports that are wide open to the Internet!

Fortunately, it is not hard to block the Internet from getting to your LAN. In fact it works exactly the same as iptables.

If you already have an iptables script then add some lines similar to this;
LAN=eth0
IP6WAN=ip6tunnel

# Allow returning packets for established sessions
ip6tables -A INPUT -m state --state ESTABLISHED,RELATED -j ACCEPT
ip6tables -A FORWARD -m state --state ESTABLISHED,RELATED -j ACCEPT

# Accept ALL packets coming from our local networks
sudo /sbin/ip6tables -A INPUT -i $LAN -j ACCEPT
sudo /sbin/ip6tables -A INPUT -i lo -j ACCEPT
sudo /sbin/ip6tables -A FORWARD -i $LAN -j ACCEPT

# Allow all traffic out from this host
ip6tables -A OUTPUT -j ACCEPT

# Drop all other traffic from WAN
ip6tables -A INPUT -i $IP6WAN -j DROP
ip6tables -A FORWARD -i $IP6WAN -j DROP

As you can see, it is no different than using iptables, apart from the name of course.

With your firewall in place, try doing another nmap -PN -6 scan to your client and this time you should see something like this;
nmap -PN  -6 2001:470:d:1018:5054:ff:fe64:cf4d

Starting Nmap 5.00 ( http://nmap.org ) at 2011-06-21 12:23 EST
All 1000 scanned ports on 2001:470:d:1018:5054:ff:fe64:cf4d are filtered

Nmap done: 1 IP address (1 host up) scanned in 201.41 seconds