This is the latest installment in my
series of getting IPv6 working on your network.Pre-requisites:
A router with a working Hurricane Electric IPv6 Tunnel OK, We will be working on your IPv6 enabled router.
Start by logging in to a console session as root;
sudo -iFirst we must enable IPv6 forwarding.
Edit this file;
vi /etc/sysctl.confUncomment this line;
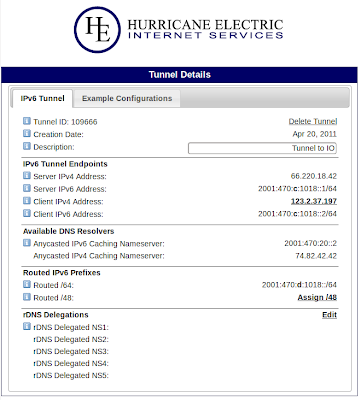
net.ipv6.ip_forward=1Because we are needing our LAN clients to route out to the Internet they will need to be on their own subnet. Take a look at the "Tunnel Details" page for your tunnel at the Hurricane Electric website.
Mine looks like this;

See the section called "Routed IPv6 Prefixes"?
Note down the address for the "Routed /64:" subnet.
For routing to work, just like IPv4, our server must have a static IP address in that subnet.
Edit your interfaces file;
vi /etc/network/interfacesAdd the following lines;
#IPV6 configuration
iface eth0 inet6 static
 address 2001:470:d:1018::1
 netmask 64
 gateway 2001:470:c:1018::2
You will notice that I have chosen to use the "1" address in my routed subnet and the default gateway is set to be the address of my local end of the IPv6 tunnel.
At this point you should reboot the router, and then log back in again as root.
On IPv6 we don't need to use DHCP to provide addresses to our LAN clients (although we can if we want to). Instead of being
given an address, our clients will
create their own addresses based on the network prefix that our router will advertise on the LAN. This is done using a program called radvd (Router Advertisment Daemon).
Install radvd;
apt-get install radvdTo configure raddvd we need to create the following file;
vi /etc/radvd.confEnter the following code;
interface eth0 {
        AdvSendAdvert on;
        MinRtrAdvInterval 3;
        MaxRtrAdvInterval 10;
        prefix 2001:470:d:1018::/64 {
                AdvOnLink on;
                AdvAutonomous on;
                AdvRouterAddr on;
        };
};
Note that the prefix here is the same subnet prefix that we used in the previous step (sans the "1" address we added).
Now we can start the radvd service;
service start raddvdYou should now be able to go to a LAN client, refresh the IP address and see that you have a proper IPv6 address!
Lets take a look at a clients address;;
ifconfig eth0
eth0      Link encap:Ethernet  HWaddr 52:54:00:64:cf:4d
          inet addr:10.1.1.61  Bcast:10.1.1.255  Mask:255.255.255.0
          inet6 addr: 2001:470:d:1018:5054:ff:fe64:cf4d/64 Scope:Global
          inet6 addr: fe80::5054:ff:fe64:cf4d/64 Scope:Link
As you can see, our LAN client now has an IPv6 Address in our routed subnet.
Try a ping to google;
ping6 ipv6.google.com -c 4
PING ipv6.google.com(2404:6800:4006:802::1012) 56 data bytes
64 bytes from 2404:6800:4006:802::1012: icmp_seq=1 ttl=54 time=444 ms
64 bytes from 2404:6800:4006:802::1012: icmp_seq=2 ttl=54 time=440 ms
64 bytes from 2404:6800:4006:802::1012: icmp_seq=3 ttl=54 time=436 ms
64 bytes from 2404:6800:4006:802::1012: icmp_seq=4 ttl=54 time=437 ms
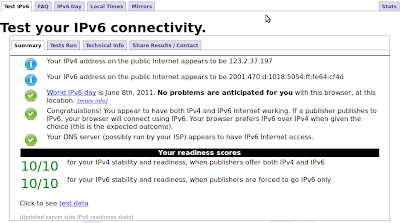
At this point you should be able to browse on your client to ip6-test.com and test your IPv6 again.

If all is good, you will get 10/10 tests right. If your DNS provider let's you down and you get a 9 don't worry too much, we will cover that topic later.
OK, so your clients now have routable IPv6 address's which is great. However this does introduce some important security related concerns that we must address.
Normally your LAN clients are protected from outside miscreants because they are behind NAT and can't be reached from outside your network.
With IPv6 there is no NAT so all your machines can be reached directly. If you have access to a IPv6 enabled machine outside of your own network try pinging the IP address of one of your LAN clients. You will find that it responds without hesitation. This is especially problematic for any Windows clients on your LAN. Windows listens on a ridiculous number of open ports by default which in turn exposes these clients to attacks from the outside world.
Again from the outside network. try doing "nmap -6 to an address on your LAN. Look at all those listening ports that are wide open to the Internet!
Fortunately, it is not hard to block the Internet from getting to your LAN. In fact it works exactly the same as iptables.
If you already have an iptables script then add some lines similar to this;
LAN=eth0
IP6WAN=ip6tunnel

# Allow returning packets for established sessions
ip6tables -A INPUT -m state --state ESTABLISHED,RELATED -j ACCEPT
ip6tables -A FORWARD -m state --state ESTABLISHED,RELATED -j ACCEPT

# Accept ALL packets coming from our local networks
sudo /sbin/ip6tables -A INPUT -i $LAN -j ACCEPT
sudo /sbin/ip6tables -A INPUT -i lo -j ACCEPT
sudo /sbin/ip6tables -A FORWARD -i $LAN -j ACCEPT

# Allow all traffic out from this host
ip6tables -A OUTPUT -j ACCEPT

# Drop all other traffic from WAN
ip6tables -A INPUT -i $IP6WAN -j DROP
ip6tables -A FORWARD -i $IP6WAN -j DROP
As you can see, it is no different than using iptables, apart from the name of course.
With your firewall in place, try doing another nmap -PN -6 scan to your client and this time you should see something like this;
nmap -PN  -6 2001:470:d:1018:5054:ff:fe64:cf4d

Starting Nmap 5.00 ( http://nmap.org ) at 2011-06-21 12:23 EST
All 1000 scanned ports on 2001:470:d:1018:5054:ff:fe64:cf4d are filtered

Nmap done: 1 IP address (1 host up) scanned in 201.41 seconds

